


Plant Moulds
R 0.00
Availability:
- Thick base, durable Silicone Moulds for Resin and Polymer Clay Castings.
- Food grade so suitable for chocolate and fondant.


Silicone Moulds: Plants
Durable Silicone Moulds for Resin and Polymer Clay Castings. Food grade so suitable for chocolate and fondant.
Silicone Moulds used with Epoxy Resin
Use of a release agent when casting with epoxy resin
The use of a release agent is optional. Our moulds are made of high quality silicone and our clear and green moulds give a particularly high gloss finish without sanding and polishing. Using a release agent will prolong the life of moulds that you intend to use many times but has the disadvantage of resulting in a lower gloss finish so more sanding and polishing will be required.
Our recommendation is not to use a release agent with our clear and green moulds when they are new but as the moulds age, if resin starts to become hard to remove, then you can use a release wax. Pre-treatment of our pink moulds with our Liquid Wax Release Agent is optional.
Selection of resin to use
Many of our moulds are 5mm deep or less so our resin called "Counter Top & Shallow Casting Epoxy Resin" is an excellent resin to use with these moulds but don't use it in moulds that are more than 5mm deep as it is likely to overheat. For moulds that are 5mm deep and more you can use our "Medium Casting Epoxy Resin". It cures more slowly than our Counter Top & Shallow Casting Epoxy Resin so don't use it in moulds less than 5mm deep unless you don't mind waiting 48 hours or more for it to get hard. Our Medium Casting Epoxy Resin is a little softer and has the advantage of placing less wear and tear on your moulds but with the disadvantage of curing slowly in shallow castings. If you are pigmenting the resin to a strong colour then you can use our "Economy Casting Epoxy Resin" in moulds that are 1-10mm deep but don't use this resin for clear and light colour castings as it will discolour over time (not UV stable).
Casting resin into your silicone mould
Mix your resin and pour it into the mould. Prior to pouring the resin you can add suitable pigments and colourants and you can use multiple resin layers if required. Carefully use a torch to pop any bubbles if required but take care not to damage the mould. As the resins mentioned above have a high flow you should not encounter air problems provided you work carefully. Keep the mould on a flat surface in a protected area that is free from insects and dust while the resin cures. Remove the resin casting from the mould once it is hard.
It is easy to drill a hole through the cured resin, after it has been removed from the mould, for use in jewellery.
Increasing the gloss of you finished resin creation
If you want to increase the gloss of your finished casting you can do any of the following:
- Apply a coat of our XTC-3D Brush-On Coating. This gets mixed like a resin and then applied with a brush. It levels out with no brush marks to create a glossy finish.
- You can "paint on" a thin layer of a Shallow Casting Epoxy Resin. Problems with this approach are that the resin may tend to pool in crevices and thin layers of resin take much longer to cure (especially in a cold environment)..
- You can apply a number of stages of sanding and polishing. You can see many examples of the sanding and polishing of resin on YouTube.
Mould |
|
| Mould |
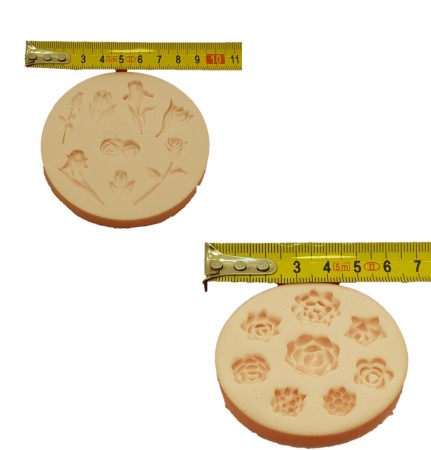
Cut Flowers: Set of 8
Flower Heads: Set of 9
Succulents: Set of 8 Small
|